Recycled Plastic Bottle Pots
This year my husband and I have decided to start a
garden. Our goal was to grow organic vegetables,
become a little more self-sustaining, and maybe even shave a few dollars off
the grocery bill while at the same time not having to sacrifice fresh healthy
veggies. But we soon realized starting a
garden can be a little daunting when you take a walk through the garden
section, so many supplies, so many tools, so much money can be spent if you’re
not careful. So, in order to achieve our
gardening goal, and not sink a ton of green into our green living, I’ve come up
with a few tricks to help us save. The
first of what I hope will be many more cost cutting tips, is my recycled
plastic bottle pots. No, this is not a
revolutionary ground breaking concept, but for those of you that are a little
slow (like me) maybe this can help you too.
This is a super easy project that requires minimal effort,
one tool, and the best part…FREE! Just
dig out those plastic bottles out of your recycling bin, if you don’t have a
recycling bin (get a recycling bin) dig it out of your neighbors recycling bin
and you’re in business!
Materials:
Plastic drinking bottles
Potting soil
Plants or seeds
Tools:
Sharp knife
Ice pick (optional)
Heavy duty gloves (optional for you rebels that like to live
dangerously)
 Take your bottle (any plastic container will do), lay it on its
side on your cutting board and grip securely with one hand and cut 3 to 4 inches
from the bottom. The height of your
bottle pot should be determined by the size of plant you will be using this
for. But, be careful not to make it too
tall or it will take a lot more potting soil to fill it, and since this is just
a temporary fix till your plants are big enough for the garden why waste that
expensive dirt?
*A tip for cutting, most of your popular bottles have ridges
along the sides as part of their design.
Use this as your marker in order to keep your knife in place as you cut.
After you have cut the bottles, take your knife or another
sharp implement to cut small holes in the bottom for drainage. I put my knife inside of the bottle to keep
it steady, and since I still have all of my fingers after, so I would say that
it was successful.
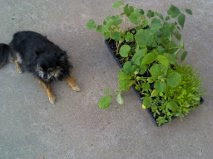
As you can see my plants have exploded and have quickly
outgrown their fancy seed starter trays they started out in. But, I’m not ready to plant them in the
garden just yet, mostly because I have yet to build the raised beds for
them. Leo is helping demonstrate that
the plants are over running their existing home. He’s so helpful!
Now put your plants in your free bottle pots and
congratulate yourself on your thrifty genius!
And it you need something to help you corral all your clever
little pots you can reuse the tops of your seed starter.
Or a handy dandy cardboard six pack caddy.
I hope this helps you in your own gardening adventures,
enabling you to provide healthy produce for your friends and family at a much
lower cost than the store. Fresh fruits and veggies should be a part of
our daily lives. And with the economic stress
we’re all under, eating healthy should not have to be forfeited for cheaper less
nutritious options.
Good luck my green thrifty crafters! And may the green thumb be with you!


