
I have a new decorating love! His name is Glad, Glad Press'n'Seal, and he's wonderful! So versatile, so easy, so…cheap, but in a good way, he's a gentleman you know. It was love at first craft. I had seen the idea before on Pinterest using Press'n'Seal on mirrors for Halloween spookifying at thriftydecorchick.blogspot.com , but I wanted to see just how versatile he could be, could he do lettering? Allow me to paint on doors without being noticeable? Yes, ladies, I am here to tell you that he is in fact all that and a bag of chips (cuz he can wrap up the chips too!), and the best part, he has brothers just like him! Sooo, you too can have eternal happiness too, for under $5 dollars!
Heeeeeres Press'n'Seal!!!!!!!
(I got a little excited about my new friend; we got a little silly after crafting and had to break our relationship in with some photo ops)
Ok, I'm done gushing…for now. So, you want to see what sweet, sweet crafts we came up with? I knew you would.
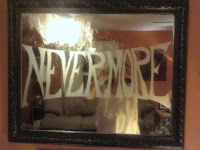
First up, Frosted mirror writing. I wanted a little something to add to The Raven Room, because I don't know if you have the same problem but I often feel that people don't always get the theme to my Halloween rooms, perhaps because I don't choose obvious themes and lean more to the obscure, like The Raven I had talked about in a previous post dreamingofpinkelephants.blogspot.com, but I do like a challenge. So to better convey my themes to my guest I prefer to just spell it out for them. Plus I thought it would be especially menacing touch to have a cryptic NEVERMORE written out in the mirror where visitors first come in.
This is a great craft for those that don't want to spend a lot on their holiday decorations and that just want to throw it away when done rather than adding to storage. This project took about twenty minutes, and if you select a simple silhouette or shorter word it would probably take less than that. All you need to complete this project is your Press'n'Seal, a pencil, and a xacto knife.
Apply your Press'n'Seal, give yourself more than you think you will need, I had to redo my first application because I was a little too stingy. Start from the middle pressing firmly, you will notice that static cling will grab it at first, but to keep it up there press your fingers starting in the middle and working your way out. To tell it's getting a good grip it will give the look of frosted glass and won't wiggle around.
Once you have pressed your P'n'S (Press'n'Seal, sorry, getting a little tired of typing it our every time you know), securely into place you can start cutting your design or if your striving for a more complicated design you might want to lightly trace with your pencil your design. Be careful not to press too hard or you will risk tearing it. To help me lay my lettering out I cut out the shape I wanted my word to take with my xacto knife.
Now that you have it laid out the way that you want, you can start lightly cutting with your knife. Again you don't want to press too hard or you'll risk snagging your P'n'S, and though I doubt the xacto knife blade is strong enough to scratch mirror glass, better safe than sorry.
As I cut, I prefer to take away the negative space as you go so you can see how its' coming out, that and I'm super impatient and I get too excited to wait.
You may notice that once you start to remove the unwanted P'n'S that it leaves a bit of a residue; it does come off with window cleaner and a bit of elbow grease, so not to worry. I left it on there because I think it gives a nice distressed mirror look that I think compliments my theme of old creepy house, so I like it. But if that's not your style of decorating you can clean it off just be careful not to get too close so you don't mess up all your hard work.
Ta Da! Isn't it awesome what he can do!
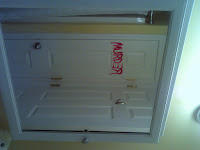
Here's another quick easy project. For years I've decorated my bathroom in a theme of Psycho/The Shining, and it just so happens that directly behind the mirror is a closet door so it would be perfect for the REDRUM scene, except for the fact that while it would be super easy, I don't feel like repainting my bathroom door every year. So I had just about given up on that project till he came into my life and made my dreams come true!
Apply your P'n'S to your door, I started again in the middle but this time I went with the direction of the wood grain so it would blend well. This time don't trim the excess until your paint has dried so you don't get wet paint all over your door.
To apply the paint, I just dunked my finger in the paint, and it gave the same look as the movie, which is good, but bad because truth be told, I am terrified of that movie and now I am slightly afraid to use my bathroom, which means it's awesome!
Once your paint is dry trim the excess off, or if you're impatient like me keep your magic eraser handy when you inevitably smear wet paint on your door. Once you have trimmed any unwanted P'n'S off, press the free edges down and admire your work!
Isn't it cool how you can see it backwards in the mirror just like in the movie, Eeeeeee!
Like I said before this is very versatile so it would be great for other holidays and events, I'm already planning on some pretty snowflakes for Christmas! I hope you have as happy of a relationship with Press'n'Seal as I have. If things work out for you, please let me know what fun projects you come up with, as this is my first experience with this stuff I feel that this is just beginning to scratch the surface so let me know what you come up with!
UPDATE:
Here's another example of Press'n'Seal at work. I used this example at a local resturant I decorated for Halloween, same application as before, this time with faces and hands instead of lettering. For the faces I just free handed the images, and traced my own hands. Then to give it an extra creepy effect I draped some creepy cloth from the dollar tree over the mirror. Another quick, easy way to creep up your place for Halloween!


